I wanted to title this blog “DIY“, but decided to go with something a little less obvious. So, welcome to my DIY blog. I promised I would share my DIYs with you all so here goes.
Keep in mind that, I am no professional. Whatsoever. My husband played a major part in about 75% of these projects, but we love DIYs. He is such an amazing man in general, and an awesome handy-man. His head would be so big right now if he were reading this. I can already see his cute smile.
I swear, he brings home more random stuff to build with than he does his own lunchbox. Yet, he wonders where all of our Tupperware bowls go. Just like any man, am I right?
So I have pulled pictures from I believe all of our DIY projects to share with you all. These projects are unique and range in categories. Again, we are not professionals. Although, my husband would say he is. I will say, he is pretty smart when it comes to building.

Red & White Handmade DIY Tutu
So, I used to have a business where I made many different kinds of Tutus. From colors to sizes, and some even had glitter. No, my husband played no part in the making of these. He hates glitter. Honestly, I hated that kind of glitter as well. It was everywhere. Almost like we had Guy Diamond from Trolls living in our house. I no longer make these, as I drifted away from actually enjoying it. Below is the YouTube link that taught me how to do it myself.
How to make a Tutu QUICK & Easy!

Mickey Mouse Invitations
Our next DIY was our daughter’s 1st a birthday invites. Yes, I said “our”. My husband helped me with these because he can sew better than I can. I’m cool with that. She was turning 1, and OBSESSED with Mickey Mouse. That’s all we watched. Over and over, and over again. So, of course I wanted to go all out. I found this idea on Pinterest. We did ours a little different, but you get the idea. They were a huge hit! I loved the pockets for the party info, and I also placed a 1st birthday picture in them. Link below.
DIY Mickey Mouse Felt Invitations
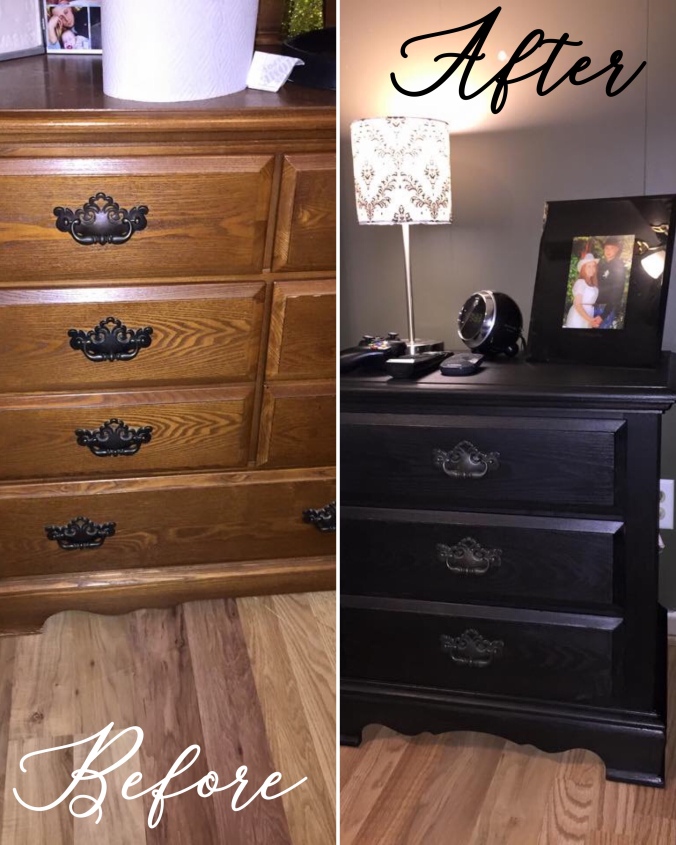
Furniture Restore
My husband did most of the work on our dresser & nightstand. I hate sanding. HATE it. So he sanded them down, we cleaned them up, and used a flat black paint to cover them. We left the handles their original color because the black paint made the handles stand out. This was before my farm charm addiction took over. I do miss our black dresser from time to time. It turned out so beautiful. No link for this one, we had just got a new bed frame that was black (supposed to be brown) so we improvised.

Bedroom Wall Decor
This was something simple and small that I made to go up above our bed. I bought these wooden letter cutouts from Walmart for less than $2 and a stencil pack for $1. I painted them black first, then used the stencil to go over in white.

King Size Log Bed | Bedroom Wall Decor
There are 2 DIYs in this picture. Well, 3 if you count the hanging lamp, but I hated the setup so it didn’t stay up long. These logs are straight out of my Aunt’s beautiful wooded back yard. It took my husband 2 months to build this for us between life and work. He was set on a log bed, so he made it happen. The picture does this bed no justice whatsoever. He supplied the wood for the sign that I painted above the bed. It reads “Truly, Madly, Deeply EST. 2011” which was the year we met & fell in love. I sanded the wood a little, and painted it with white strokes, and used Greek letter stencils that I had bought from Hobby Lobby for $4.
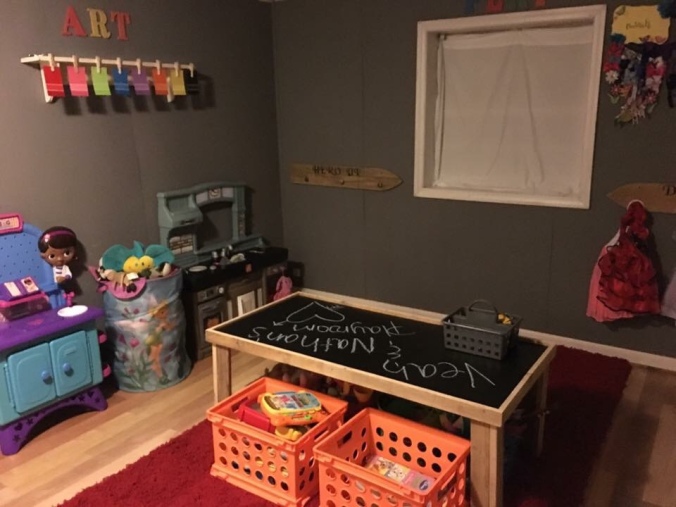
The Playroom
The playroom! All of these pieces I got from ideas on Pinterest. I remember us doing this whole playroom in 2 days. I’m impatient, and was overly excited about it. The grey walls did NOT turn out how I had imagined. It was a little too dark for me. The orange crates were a last minute run on the day before school started that year to Walmart & they were only $4! Never again though. It was a madhouse. My stepdad gave us the fluffy red rug, as we were trying to implement all colors if possible, to make it “neutral”. I loved their dress-up hanging stations, and couldn’t wait to add to Nathan’s side once he could wear them. The white shelf was something we had put away, so we hot glued clothes pins to hang paint swatches that Vaeh had racked up on from a trip to Walmart one day. She gets some every time we go. There are 2 funny parts this DIY. One being that this playroom only lasted about 2 months, then I changed it back to Vaeh’s room with a “mermaid” theme – which also didn’t last long. Second part, I’ll let you figure that one out. It’s in the photo. All I’m saying is tired mom moment.

Below is a better picture of the DIY table.

Barn-wood Table
This table was originally supposed to be an entry/mud room table. It’s so huge though. So, we ended up deciding to use it as our TV stand. It’s one of my favorite DIYs. The top picture is before & after I stained it. If we ever replace our TV stand, this will probably be moved to the master, and I’ll find something to use it for. I got this idea off of Pinterest as well. Once I found, I showed my husband it it looks exactly the same, other than the dimensions.

Farm Charm Coffee Table
Our DIY coffee table. I got it in my head that I really wanted one of those super cute low and huge farm house style coffee tables. So, my husband built me one. I stained it. Completely forgetting about why we didn’t have a coffee table in the first place. Backstory: our daughter fell off of the couch when she was a baby and to this day I still believe she hit our old coffee table. All babies fall. It happens. Yes, old. It’s gone now. We threw it out in the burn pile. I miss it now. It was beautiful & heavy, and the wood stain was perfect.
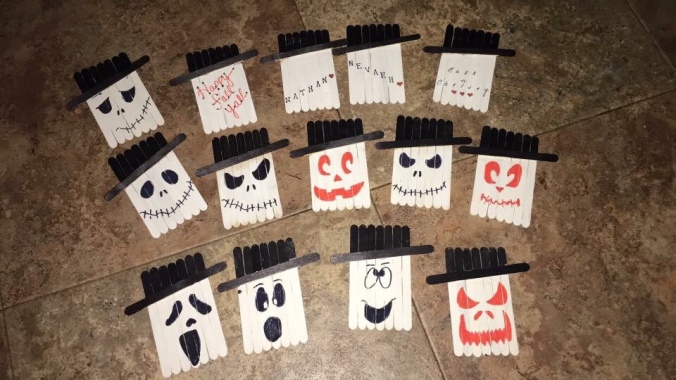
The next 5 pictures are some DIY projects that I did with or for our kids.
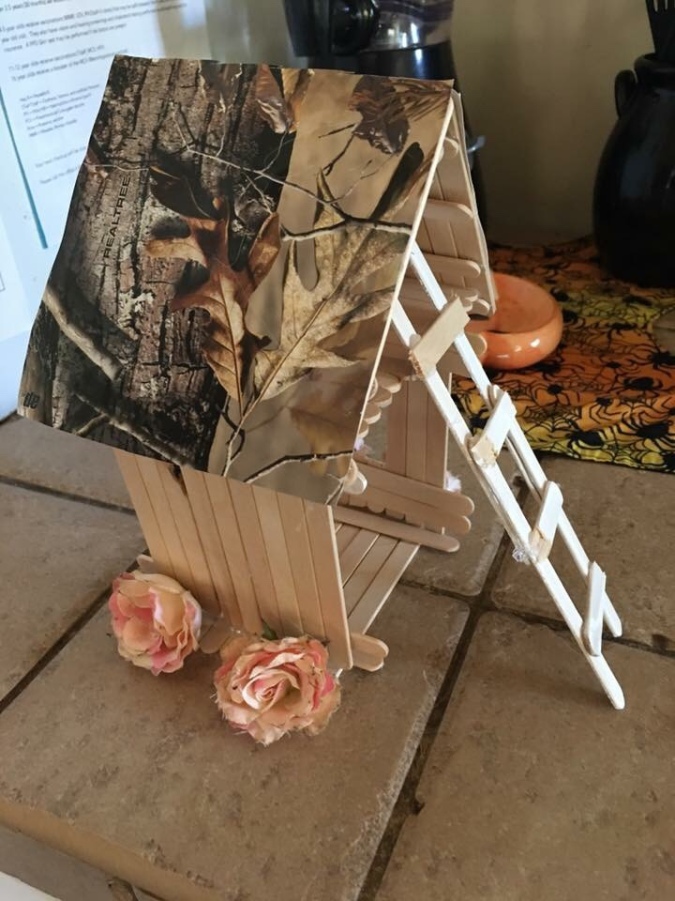


The first picture is a popsicle stick house that me and my daughter made together one day. We just used what we had, & it was awesome! I must say, for a 3 year old, that popsicle stick house lasted a while.
The second picture is a set of Halloween ornaments we made for our Halloween themed Christmas tree we did in 2016. It was awesome. I had to hurry and get it done while my husband was at work. He’d rather wait until after Thanksgiving to put up a tree, but I saw an idea and had to do it. He ended up loving it too, eventually. If you want to see this Halloween tree, reply with a comment to this blog and let me know. You can also send me a private message on Instagram. I’ll link my page at the end of the blog.
The third picture is definitely one of my favorites! I got this idea off of Pinterest, and the BEST part they are free printables. These custom gift tags from the North Pole are gold! Link below.
Free Printable Christmas Gift Tags From Shabby Art Boutique
The 4th picture is a magic key tag that I designed for Santa to be able to deliver presents to our babies. We don’t have a fire place, and my daughter loved this idea. I used an old key off of a 3 piece key hanging decor item from Hobby Lobby.
The 5th picture is our “counting down the days until Christmas” piece. My husband supplied the wood. I did the rest. I can’t even tell you how many times I re-did the font on that wood. I could never get it the way I wanted it. I hung it up for Christmas in 2017 but I’ll probably do a different DIY for this year to count down the days.

Antique Desk
My antique desk, which used to be a vanity, also used to be jet black. I wanted something lighter that had more of a farm charm to it. So I bought white & grey spray cans from Walmart, and first I used what what I had to cover most of the black. I didn’t buy enough, clearly. Then I sprayed the grey onto a bag that just so happen to be beside me, and use a paint brush to add the grey strokes over the white. My friend, Ashley, helped me with this one. I got annoyed with it. She loves farm charm also.
& here is what it looks like now: (except it’s been moved across the room in my “creativity corner”)


The Welcome Sign
The “Welcome” sign that you see has an awesome backstory to it. First, I did get the idea off of Pinterest and had been wanting to make one for a while. So, my husband had some old lumber that had been cut and stripped, so I decided to use that. Plus we were running low on wood considering we were getting ready to move, and he was actually decluttering! The day that this was made, we had some friends over. So my husband left to go fishing with the guys, and they took our daughter with them. The boys were content in the house playing. Then the girls got down to business. We were going to figure this shit out. We had tons of energy and we were full of determination to get it done without needing “a mans help”. For one, the wood needed to be sanded down. Not only that, it also needed to be cut. With a saw. Which is something I’ve never used before. So my friends Ashley & Taylor, who are sisters by the way, said let’s do it! So here I am, standing on a small ass step ladder trying to get this heavy piece of wood down from the top of our car port, and luckily didn’t fall. They were worried but laughing incredibly hard at the same time. I guess you could say we were all so full of giggles because we wanted to hurry the hell up and “git-r-done” before the guys got back from fishing. Which was just a walk over the hill. We were being so loud, honestly thinking they could hear us, but no they never heard a thing. Damn it. I finally got the wood down, and Ashley grabbed the saw, while Taylor and I held the wood in place, while also laughing are asses off. I kept thinking, he is going to hear this saw running, and come charging over the hill to figure out what in the world was going on. Nope, still nothing. After we finally got the right length, Taylor sanded the wood down, and I stained it. During this whole process we were laughing so hard and seriously contemplating on creating a southern women’s DIY YouTube video, because a woman can! If we would have done that, I would definitely link the video! Good times, and good memories. Laughter really is the BEST medicine.

Deer Rack/Antler Wall Hanger
So we have a lot of racks/antlers – people refer to them differently. They were given to us buy a friend of my husbands and I knew exactly what I wanted to do with some of them. I picked through the pile and chose this one for my daughter’s room. First, I spray painted it with gold glitter, let it dry, then placed it on her wall. Then I placed her dress up clothes on one side, and her jewelry on the other. She loves it!
That’s all for my first DIY blog. I hope you enjoyed reading it! Stay tuned for future DIY blogs with tips and ideas, as I tend to do a lot of projects during the Holiday seasons.
Leave me a comment, let me know which one of my DIYs was/is you favorite! What are some of your DIYs?
Below are the Instagram links:
– raising.arrows.x2 Chels ♥️

I just love your style ❤️
LikeLiked by 1 person
Aww, thank you!
LikeLike
Love this, all fun projects that playroom is too cute
LikeLiked by 1 person
Thank you Kim! Yes that playroom was a handful! Lol.
LikeLike